Puff pastry with kefir: composition, ingredients, step-by-step recipe with photos, nuances and secrets of preparation. A simple and clear step-by-step photo recipe for making chopped puff pastry at home. Is there a difference between quick dough and regular dough?
In order not to get into this jungle, we will agree to call “chopped” any dough made in the manner described below.
Thus, this type of test includes:
Two types of classic shortcrust pastry: sweet pate Sucree/pasta Frolla and not sweet pate Brisee/pasta Brisee/Shortcrust pastry
These two types of dough contain little or no liquid.
There are a lot of variations of chopped dough with a lot of liquid, which are called “false puff”.
This dough, if prepared correctly, is not inferior in taste and quality to puff pastry. It is radically different from the two types of dough mentioned above in structure and taste, as well as in scope.
Shortcake (buttery pastry). Used for cakes.
Depending on the purpose of the dough, the flour-butter-liquid ratio varies, eggs and baking powder are added or not, and the type of liquid (water, milk, cream, sour cream, kefir). Some types of chopped dough also include cottage cheese.
The result is a completely different dough, most suitable for a particular type of baking.
The first stage is preparing the butter grits.
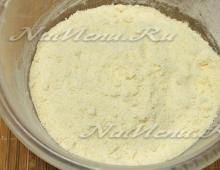
1. Measure out the amount of flour required by the recipe, add all the dry ingredients required by the recipe and sift everything together.
2. Cut the butter required in the recipe into 1x1 cm cubes and place in the freezer for 15 minutes if you are making the dough with a knife or in a food processor, or in the refrigerator for 30 minutes if you are making it by hand. In the first case, the oil should be frozen, in the second - cold.
3. Pour the flour onto a board or into a processor bowl, spread the frozen butter on top and chop the butter with a knife, raking the flour, stirring until you get dry, crumbly grains. In the processor, chop with a boomerang-type knife in the “pulse” mode.
If you are preparing the dough by hand, pour the flour into a large bowl and rub it with the butter with your fingertips until you get a dry, homogeneous crumb.
The more homogeneous the mixture, the more the product will resemble sand in its structure. The less homogeneous - flaky.
The second stage is preparing the dough.
1. Mix all the liquid required in the recipe together.
2. Pour the flour and butter into a bowl, pour the liquid component evenly on top of the flour or lay it out (if it is sour cream or eggs).
3. Mix quickly with a fork - loosen the dough, moistening it.
4.Pour the dough into a plastic bag and knead it with several movements, collecting it into a ball or simply collecting it into a ball in a bowl.
5. Flatten the ball into a disk and send the dough to “rest” in the refrigerator for 15 minutes.
The most frequently asked questions and answers to them.
Why prepare the butter-flour mixture this way?
Flour is known to contain proteins. glutenin and gliadin, which When flour and liquid are mixed, they form gluten (a molecular network). Gluten gives dough elasticity and retains liquid and gas inside the dough.
This property of gluten is very important, for example, in yeast dough.
In chopped dough, excess gluten is not needed; the less of it is formed, the more crumbly and tastier the dough will be.
When mixing flour and butter, flour particles containing glutenin and gliadin are partially blocked from moisture penetration - and this prevents the formation of gluten.
However, you cannot allow the butter to completely mix with the flour into a homogeneous substance. During baking, heat turns water into steam and creates a cavity in the dough - this is how layers are formed.
In chopped dough, these layers are short (we crushed the butter) and chaotic, not like in real puff pastry, but in any case, they are there. Therefore, you cannot chop the butter very, very finely. The pieces should resemble grits - not greasy powder.
Why can’t the dough be kneaded long and intensively?
The dough cannot be kneaded, because... kneading the dough promotes the formation of gluten.
PWhy does the dough need refrigeration?
Cooling is necessary so that the butter does not melt during cutting and does not mix with the flour - the layers will disappear.
Why do you have to roll it out this way?
During the rolling process, the gluten chains are stretched. By tearing the rolling pin away from the dough and changing the direction of rolling, we do not allow long chains to form - short ones are formed, and the heating of the oil in the dough is less (any pressure on the dough increases its temperature).
Why need to be rolled out thinly chopped dough with plenty of liquid?
Roll out the sheets thin but of uniform thickness.
Such sheets quickly warm up, steam quickly forms, which quickly evaporates, the layers quickly “dry” and the resulting cavities inside the dough do not “disappear.” Otherwise, the upper layers of the dough will warm up and the steam will evaporate while the inner layers warm up. The cavities of the outer layers will fall off and they will begin to burn, and by this time the inner layers will not have time to form steam - the result will be a “sticky” dough, and not light and airy.
How thin should the rolled sheets be?
As thin as possible, ideally, the surface on which the dough is rolled out should be visible through the rolled sheet. If the dough breaks during rolling, this does not affect the quality of the baked goods; it is important that the area on which the filling is placed remains intact. In addition, you can connect the edges of the tears and roll them up. You can apply dough patches. However, of course, you need to try to roll out carefully and without a lot of breaks.
Is it possible to add flour and turn the dough from side to side?
You have to add flour while rolling out the dough. It is important to try to make the layer of this flour as thin as possible and use as little flour as possible for the topping.
You can and should turn the sheet being rolled out from side to side.
It is very convenient to use special rolling pins - hollow inside, into which you can pour ice water, and silicone mats, to which the dough sticks less.
Can the dough be stored in the refrigerator or freezer?
The dough can be prepared a day or two in advance and stored in the refrigerator or freezer for quite a long time.
How to work with frozen/very chilled dough?
After taking the dough out of the freezer, let it melt in the refrigerator for 12 hours.
If the dough was simply stored in the refrigerator for a long time, it can harden very much and turn into “stone.”
In this case, you need to let it warm up in the room to such a state when it will be kneaded “into a flat cake” without crumbling into crumbs. If it no longer crumbles, but only cracks around the circumference, this is a sign that it can already be rolled out. Uneven edges can be eliminated at the time of rolling. But the most suitable consistency is when the ball can be flattened into a flat cake with little effort, but the edges no longer crack.
If the dough has not hardened, then you should not take all the dough out of the refrigerator at once to roll it out; it may heat up. We take out only one portion that we are working with.
The basket is not baked in the quiches, what should I do?
This largely depends on the oven. You can bake it until done, and then, when the filling is added, place foil under the quiche pan and a foil ring on top. This will prevent the bottom and edges from burning when re-baking.
The baskets get wet from the cream/fill when baking. What to do?
Baskets need to be insulated.
Baskets that are no longer intended to be baked are coated with a thin layer of melted chocolate or heated jam syrup. Then it is cooled until it hardens and only then filled with cream.
Baskets that are baked a second time are coated with yolk, beaten with a drop of water and a pinch of salt. Then you need to put this basket in the oven for 2 minutes until the yolk dries. Then you can add the filling/filling.
Somehow, in my opinion, I began to slack a lot... I managed to stretch the most ordinary chopped dough into three full-fledged posts... But on the other hand, summer is a little relaxing, don’t you think? And lately, only cold soups have appeared in the feed - I don’t have enough strength for anything else. So don't expect any revelations today. Will recipe for the most basic chopped dough... But - the best, and proven - as usual.
To be honest, I deliberately divided all the information into different posts. In the future, I'm sure it will help to link directly to the desired section - be it the "rubbing in butter" method, or a recipe for pie dough...
Why do I call this recipe the best? Everything is very simple. INI already mentioned the role acids- it makes the dough more tender, and, oddly enough, more “layered”. It is from here that the legs “grow” for all kinds of “sour cream”, “kefir” and “curd” versions of chopped dough. There is only one answer - acid. But you can add it in several ways - it could be apple cider vinegar, or lemon juice... or - as I already mentioned - something fermented milk. Just keep in mind that the total amount of liquid will have to be reduced accordingly. In the case of kefir, it completely replaces water.CHOPED PIE DOUGH
For a mold with a diameter of 20 cm:
300 g flour (100%)
200 g cold butter (70%)
70-90 ml ice water (30%)
10 ml (2 tsp) apple cider vinegar or lemon juice
a pinch of salt and sugar
Chopped dough is kneaded
1. Stir vinegar or lemon juice into water and place this mixture in the freezer for 15 minutes.
2. Cut the butter into large cubes and also place in the freezer for 15 minutes.
3. Sift the flour and mix with salt and sugar.
4. Using knives, or a food processor, or a mixer with a paddle attachment, “chop” the butter and flour to the size you need. If you need chopped puff pastry, the butter should remain the size of a large pea. If you want a more tender, simple chopped dough, grind until it becomes fine crumbs (or corn grits). If the oil starts to heat up, put the mixture back in the freezer for 15 minutes.
5. Add ice water to the cooled butter mixture. Don't add it all at once - watch the consistency. The dough should begin to come together into a ball, and when squeezed in the palm of your hand, it should not crumble.
6. Using your hands, gather the dough into a ball, wrap it in film, press it down with your hand to form a disk and put it in the refrigerator for 30 minutes - so that the dough cools well.
The chopped dough will keep quietly in the refrigerator for three days to a week. It keeps well in the freezer for longer.
This is about the recipe.
And now a few more tricks - to clear my conscience - you never know who didn’t know before...
How to roll out chopped dough?
Lightly dust the table with flour, place the disk with the dough, roll it with flour on all sides and roll it out with a rolling pin in one direction, constantly lifting and making sure that the dough does not stick. While rolling, turn the dough 90 degrees and roll further.
How to transfer already rolled out dough into a mold?
There are several options. Or “roll” a layer of dough onto a rolling pin and thus transfer it into the mold. Another option is to fold the rolled out dough in half, and in half again. In this form, transfer it to the form and unfold it there. Well, the third option is to place your palms with the back side up, with your fingers spread, under the layer of dough and thus transfer it into the mold.
How much test will I need?
The bases for various pies are usually baked from chopped dough. The filling can be either sweet or not sweet, then no sugar is added to the chopped dough. It also makes very tasty crumbly cookies (which need to be baked at 180 degrees for 10-15 minutes until golden brown, not golden brown), tartlets and much more.
The chopped dough prepared according to the recipe includes the following ingredients:
this amount of ingredients is enough to bake a base (without top) with a diameter of 24 cm
For different pie recipes, some ingredients can be replaced in whole or in part. All of the following additions or substitutions are added depending on the purpose of the test. Because the result is a completely different dough, more suitable for a particular baking.
Egg can be replaced:
Flour can be partially replaced with ground almonds, approximately 1/3-1/4 part.
Also, sour cream is sometimes added to the chopped dough, also replacing some of the liquid ingredients with it. Fermented milk products, and acid in general, give chopped dough greater layering.
To flavor the chopped dough, you can use vanilla, lemon zest, rum and much more.
Steps for preparing chopped dough according to the recipe.
Chopped dough, like puff pastry, does not like heat. That's why knead it is needed very fast and it is best to use a food processor for this (I used a blade attachment for kneading).
Cut the butter into small pieces and place in the freezer for 15 minutes.
If you replaced the eggs with water or juice, then they also need to be placed in the freezer for 15 minutes.
Sift flour into the bowl of a food processor, add sugar, salt and butter. Turn on the food processor and chop the butter and flour. To prepare puff pastry, the butter should remain in small pieces. And for regular chopped dough, you need to grind it until it becomes fine crumbs.


Now add the egg to the processor, turn it on again and knead the dough.
There is no need to achieve homogeneity; the mixture should be thick and crumbly. At the same time, it is very easy to mold.


If you still think that the dough is too dense, then add a tablespoon of ice water.
We collect the finished dough into a ball, put it in cellophane and put it in the refrigerator for about 30-40 minutes.

At manual kneading Cut the butter into small cubes and cool (it’s even better to grate cold butter). Chop the butter with two knives with flour and sugar. Add egg or water and knead the dough with a fork. If you feel that the butter has begun to melt, it is better to put the dough in the refrigerator for a short time. Because flour should not mix with butter, but should only envelop it.
Chopped dough can be used immediately after preparation, or can be stored for several days in the refrigerator, as well as several months in the freezer.
Bon appetit.
If you don’t know what else delicious to surprise your loved ones and please yourself, make a pie from chopped dough. This is a baking base that, in texture and taste, resembles something between shortbread and. But it is much easier to prepare, which is why modern housewives love it so much. Let’s look at how to do this “piece by piece”.
Features and characteristics
There is some confusion in culinary terminology: chopped dough is often called shortbread, and puff pastry - chopped. In fact, there is some truth here; chopped is very similar to both. In order not to get confused, it is worth finding out what types of this test there are. But first of all, let's take a closer look at what it is.
Chopped dough is called that because it is literally chopped (butter is, as it were, beaten into flour). True, modern technologies and the benefits of civilization significantly save the time of modern cooks. So, the flour product will come out of the same quality if you use a combine or mixer. The simplest and most “angry” way is to grate the butter.
The basic composition includes liquid, flour and fat. All components must be at a low temperature during cooking (preferably very cold). This combination and method of preparation prevents the formation of gluten, so the dough is not sticky or viscous, but crumbly.
There is chopped “shortbread”; in the process of preparing such a preparation, a minimum of liquid is used. They chop the dough into the smallest pieces, sometimes called “chop to.” This preparation can be sweet or savory.
The second option is chopped “false puff”. In general, if you want something made from puff pastry, you need to cook it. It is practically no different in taste and texture from real puff pastry, but it takes much less effort. When preparing it, the oil is crushed into heterogeneous, relatively large pieces. Such a preparation will require more liquid.
Also, depending on the desired result, eggs and baking powder can be added to the main ingredients. As a result, completely different versions of the test come out, with different areas of application.
Secrets of successful baking
 Preparing such dough is not at all difficult, the main thing is not to deviate from the general rules and do everything carefully. To make tasty and high-quality chopped dough, it is important to pay attention to each ingredient.
Flour. The main component of the product should contain as little gluten as possible. Special compositions for baking, as a rule, on the contrary, contain a lot of it for viscosity. “Extra” is best, but in the absence of a special type of flour, you can use any.
Liquid. Here the usual one is most often used. Dairy and fermented milk products are used less frequently: , . Eggs also perform this role well. Although the traditional recipe for chopped dough contains water, that’s why amazing baked goods come out with it.
Fat. This is a very important component and a stumbling block for many cooks: some cook exclusively with butter, others don’t mind. In general, margarine is not going through its best years today, since we now know that these are dangerous trans fats. However, it used to be an indispensable ingredient for bakers.
To prepare chopped dough, it is easier to use it, since margarine has a higher melting point than butter. It is easier to work with and the texture always works out, even for beginners. But with oil the taste is still brighter and more delicate.
And acid. The salt must be mixed with the flour before the oil gets into it. This component will bring together all the flavors; it must be added even if you are planning sweet baked goods. By the way, if it is added, it must be treated in the same way as salt.
Acid helps the layers form, it loosens the dough and makes it even more tender. Reviews from experienced cooks recommend adding it to water, but if you use kefir, you don’t need to do this, the acid will already be there.
It is also important to pay attention to the temperature of all ingredients and equipment. The oil should not only be cold, it is recommended to put it in the freezer for half an hour before cooking. If during the kneading process signs of fat melting appear, you urgently need to collect the entire mass into a lump and return it to the cold so that everything freezes again.
It is also better to cool the equipment that will be involved in cooking (knife, bowl, board, parts of a mixer or food processor). Nothing should melt, mix, or melt. The liquid should also be ice cold.
Preparing chopped shortbread dough
![]() So, we figured out what ingredients we need for the dough, and how it can be made. Whatever option is chosen, the same proportion scheme always applies: 1-2-3. It means that three parts flour will require two parts fat and one part water (sour cream, kefir,). True, this ratio may vary in different recipes. But just in case you need to cook quickly and not go through a cookbook, you can safely use this scheme - the dough will definitely work out.
So, we figured out what ingredients we need for the dough, and how it can be made. Whatever option is chosen, the same proportion scheme always applies: 1-2-3. It means that three parts flour will require two parts fat and one part water (sour cream, kefir,). True, this ratio may vary in different recipes. But just in case you need to cook quickly and not go through a cookbook, you can safely use this scheme - the dough will definitely work out.
“Shortbread” dough, as we have already mentioned, is obtained by grinding the ingredients to the size of cereals. But here it is important not to overdo it; you also don’t need to bring it to a powder state, since you will get a single homogeneous mass. During baking, the water should heat up and evaporate, this steam will form chaotic and small cavities that resemble either layers or a loose texture. If you bring everything until it is homogeneous, you won’t be able to create layers; you’ll rather end up with a buttery cake.
You can start cooking:
- Sift the flour and add a little salt to it. If you are planning sweet baked goods, add sugar or powdered sugar here; if using, subtract the amount of honey from the amount of liquid. Mix all dry ingredients.
- Margarine or you need to chop it into cubes and put it in the freezer for about 10 minutes. There are types of oils that do not become hard even in the freezer; such a product is not suitable. Moreover, this property indicates low quality, and it is better to avoid this oil altogether.
- If the dough is on water, you need to add the juice of one lemon to it. Again, do not forget to maintain the proportion: the amount of juice and water should form one part of the total mass. If you use kefir or sour cream, simply leave them to cool well. It is important that any liquid is ice cold.
- When everything has cooled down well, add fat (butter or margarine) to the flour. It is better to take out some of the cold fat first, and leave the other in the refrigerator until needed.
- Next, these pieces of fatty part need to be cut with a knife directly into the flour, while mixing the dry parts with the butter to gently combine them. When you get large crumbs, take the second part of the butter out of the refrigerator and continue chopping everything until small crumbs. If during this process you notice that the fat begins to melt or has simply become too soft, immediately put everything in the freezer so that everything freezes again.
- Then pour the ice liquid one tablespoon at a time into the flour mixture. Pour a little at a time and mix gently, it is advisable to do this with a cold spoon so as not to heat the dough with your hands again. It is important not to overfill the water, so as soon as the dough can be gathered into a lump that does not crumble, immediately collect it in a plastic bag and put it back in the cold.
- Then this lump needs to be taken out and divided into two parts. We return one of them to the cold, and you can immediately work with the second.
So, the chopped shortbread dough is ready. It is suitable for open and closed pies, “upside-down” pies, and baskets. Moreover, even if the dough is unsweetened, it is still suitable for desserts. Any type of chopped dough can lie in the freezer for many months and not lose its properties, so you can make a large portion at once and divide it into parts.
Chopped puff pastry
Here the proportions remain the same, as does the sequence in preparation. The only difference is the size of the butter pieces; they will be larger than in the previous version. Sometimes this dough requires a little more liquid, this needs to be monitored during the kneading process. Once the ball of flour mixture can be rolled into a single piece, there is no need for any more liquid.
First, everything follows the standard procedure: we remove the chopped fat to freeze to a solid state, and the equipment and liquid “go” to it. While everything is freezing, sift the flour directly onto a table covered with plastic wrap and add salt there. After this, you can go in two ways: chop with a knife, as in the previous option, or do it a little easier - we’re trying to simplify the task for ourselves, right?
So, when the pieces of margarine or butter have hardened well, put them on the flour and simply roll them out with a rolling pin over the flour. In this case, the rolling pin should also be cold; if there is a hollow inside for collecting water, there will be no problems at all. You can also simply fill a glass bottle and chill it. Pieces of fat will stick to the surface of the rolling pin, simply chop them off with a knife, sprinkle them on top with a knife and roll them out again.
Over time, the flour mixture will be completely mixed, it will resemble plaster in appearance. The butter should mix well into the flour. Then we transfer everything into a container and add a little cold liquid. Then we roll the dough and leave it in the cold until the planned preparation.
 Rolling out is a separate point in preparing baked goods from chopped dough. It is important not to melt the butter or margarine during the preparation process, otherwise everything will go to waste. To prevent this from happening, take a piece of dough out of the freezer and put it in the refrigerator, where it will reach the optimal temperature. Then quickly (and again with a cold rolling pin) roll out the layer in one direction. You cannot move the dough in different directions, so as not to warm it up: we move the rolling pin from the bottom up, tear it off the dough, and again from the bottom up.
The best baking will come out if you roll it out as thin as possible. Then all the layers inside will rise evenly and bake. If you make a thick layer, the top and bottom layers will burn, but the inner layers will not cook.
Recipes with chopped dough
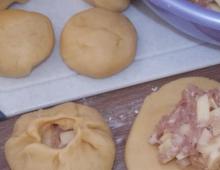
Any baking recipe that calls for puff pastry or shortcrust pastry can be used for chopped dough. It goes best with pies, tarts, and baskets. For example, consider a “delicious” recipe with such a flour preparation.
A French tart is an open-faced pie and can be made with any filling, but hard or hard varieties are best. Caramel will add a special aroma and taste. So, the dough is ready and freezing in the cold, let’s make the filling:
- You need a glass of sugar, a little citric acid or natural juice, 2-3 tablespoons of water. All this needs to be mixed in a container and put on the stove, stirring slowly. When the mixture boils, do not stir it. Now we just wait until it becomes the desired color, here everyone decides for themselves: the darker the paste, the more bitter it will be.
- After this, pour it immediately into the container where the cake will be baked. The caramel will most likely set right away - there is no need to be afraid of this, it will still melt during the baking process.
- Prepare fruits (pears or apples). At this time, you can take the dough out to soften a little. There is no need to peel the fruit; we remove only the core and cut one medium fruit into 8 pieces, or 4 if the fruits are very small. Place the finished slices in a circle directly onto the caramel.
- Roll out the dough layer, cut it in a circle and place it on top of the fruit slices. Place everything in a hot oven and wait 35-40 minutes (1900). Then you need to let the cake stand, turn it over onto a plate and leave for another 10 minutes.
This French pie is soaked in aromatic caramel, right down to the dough. If desired, you can add spices or fresh berries to the fruit, decorate everything with powder, chocolate chips or coconut flakes. This is the so-called changeling.
You can prepare it even simpler: first make the base, fill it with filling and bake, then pour over thick caramel and let stand for 20 minutes.
“Burning” questions about chopped dough
The butter has melted, how to rehabilitate the dough? No way, alas. If the fat melts during chopping or rolling, the result will be simply butter dough. There is only one way out of this situation - keep cooking. The result will be a different baked product, rather without a loose or flaky texture, but still not bad. Still, 2 parts of butter will not “go by” unnoticed, and next time try to make chopped butter again, over time it will turn out no more difficult than scrambled eggs.
Can I use leftover dough (scraps)? From what is left you can make cookies or the same baskets. The main thing is not to collect everything again into a lump. Just place one piece on top of the other and roll out.
The dough is torn, how to roll it out and transfer it? If the layer breaks during rolling, it’s not a big deal. It can be “patched” with a piece of dough or simply pinched and rolled out again. To prevent it from tearing during transportation, it is better to wrap it around a rolling pin. If a layer of dough comes first in baking, it can be folded four times and transferred to the pan, and then spread out again.
The filling soaked the dough. This often happens with baskets. If they use cream or filling that no longer needs to be baked, the finished baskets should be coated with hot water and placed in the refrigerator. After that you can fill them. If the baked goods need to be returned to the oven to process the raw filling, the dough base should be coated with beaten yolk and placed in the oven for a couple of minutes. After that, fill them and bake for the required amount of time.
In general, the preparation of such a dough can be completely mastered the first time. If it didn't work out in the first one, it will work out in the second one. The advantage of this preparation is that it can be made for future use by dividing one portion of dough into many small ones. One day of culinary experiments, and you can enjoy soft, melting pastries at any time.
You can make different delicacies from puff pastry: khachapuri, puff pastries with any fillings, full-fledged pies, cakes. Puff pastry is also used to prepare second courses in the oven, for example, chicken legs wrapped in it. Many people buy this dough in the store, and not everyone is satisfied with the quality. Today we offer you to get acquainted with recipes for puff pastry with kefir! It is prepared very simply and quickly.
Is there a difference between a quick test and a regular one?
Making regular puff pastry will take a lot of time and effort. Not every housewife, especially after household chores and work, will be happy to take on such preparation. Quick puff pastry with kefir, the recipes for which we will discuss in this article, does not differ in taste and consistency from the usual complex one.
If you prepare this product according to the classic recipe, it will take at least 2 hours, and all this time you will need to cool the dough, roll it out, add butter, fold it again, roll it out and cool it! Not ready for such feats? Then get acquainted with kefir puff pastry, which is prepared using a different method.
There are a few tricks to making quick dough with a flaky texture that will help you create something indistinguishable from the original. Use our recommendations and you will succeed!
- It is better to rub flour with butter or margarine using a fork rather than your hands. From the warmth of the skin, the butter begins to melt, it absorbs more flour, and the consistency of the dough will eventually be tight, and the layering will be disrupted, the layers will spread.
- You will need to add vinegar to kefir puff pastry; it will increase the stickiness of the flour. A lack of vinegar will lead to a bad result - blurry layers. But an excess of this ingredient will not have a positive effect on the taste.
- If you use milk instead of water, the taste of the dough will be more interesting, but its elasticity will become worse. It is better to use kefir when preparing.
Puff pastry with kefir and margarine

To prepare a delicious, tender dough, you will need a few ingredients. From this dough you can make pies and pies, puff pastries and khachapuri, and if you add more sugar, then snail buns.
Required:
- 200 grams of margarine;
- two glasses of premium flour;
- a third of a glass of kefir;
- tablespoon 9% vinegar;
- half a teaspoon of salt;
- half a tablespoon of sugar (if for sweet buns, then two tablespoons).
Preparation
The first step is to sift the flour into a bowl. Cool the margarine so that it splits and is not melted.
Place the margarine in the flour and quickly chop it with a fork or knife until the pieces are about the size of a pea.
Pour vinegar into cold kefir, add salt and sugar, dilute until smooth. Then pour the mixture into flour and margarine, quickly knead into an elastic dough.
If the product ends up thick or watery, add flour or kefir.
How to make puff pastry?

The layering of the dough is provided by pieces of margarine that are spread unevenly throughout the consistency, but this will not be enough. To prepare good puff pastry with kefir, you must first put it in the refrigerator for an hour. So that the margarine hardens again. And then create the required number of layers in the following way:
- Sprinkle the surface of the table or board with flour, lay out the dough, roll it into a thin layer.
- Dust with flour and fold in half.
- Powder again, fold again - and so on 4-5 times.
- When the dough is tall, simply roll it out again.
Surely everyone will agree that preparing this puff pastry with kefir is much easier and faster than using the classic recipe!
With egg and butter

We invite you to familiarize yourself with another recipe for quick puff pastry with kefir. Compared to the previous method of preparation, the dough prepared using this method will be denser, the taste will be slightly different, but different.
We will need the following ingredients:
- half a kilo of flour;
- 200 grams of butter;
- a glass of kefir;
- one chicken egg;
- a tablespoon of vinegar;
- a pinch of salt.
You can add sugar if the dough is being prepared for sweet products. This sugar-free dough makes delicious pizza, pies with any fillings, pies and khachapuri.
Making homemade puff pastry
The preparation itself is also different from the previous method. It is similar to creating puff pastry according to a classic recipe, but the whole process is simpler and much faster.
- Place kefir in a bowl, add salt and chicken egg, beat well with a whisk.
- Sift the flour so that it is saturated with air, so the dough will be softer and more elastic, and you can easily sculpt a variety of products from it.
- Add flour to kefir and egg, add vinegar, knead the dough. Then cover it with film and put it in the refrigerator for half an hour to “rest.” This procedure is required. The gluten will ripen during aging, and the quality of the dough will be higher.
- Cut the frozen butter into slices and divide into three equal parts.
- Dust a work surface with flour, lay out the dough, and roll it out into a thin layer.
- Place one part of the butter, rolled in flour, evenly onto the layer, wrap the envelope, pinch the edges, dust with flour and roll out.
- Add the second half of butter, dipping each piece in flour. Form the envelope again, sprinkle with flour and roll out.
- It's time for the third part of the butter. Again, dip the pieces in flour, place them on the dough, make an envelope and fold it three times, no need to roll it out.
That's all, you can start preparing puff pastry products. They will turn out much tastier than those created from a store-bought product!
Real dough for Napoleon cake

Anyone who has ever tried this cake, prepared according to the classic recipe, knows the difference between it and something similar. In a real "Napoleon" the layers consist of puff pastry, but not the kind used to make khachapuri or snail buns. If you want to please your family with a delicious cake, then take note of this recipe! The advantage of this preparation is the simplest ingredients, which, even if they are not found in any kitchen, are definitely sold in a store near your home.
Required:
- 350 grams of margarine;
- a glass of kefir;
- a teaspoon of salt;
- a tablespoon of cognac;
- half a kilo of flour;
- egg.
Cooking instructions

Instant puff pastry made with kefir is not about Napoleon cake. This recipe is very different from the ones presented above, but it still prepares the dough faster than regular puff pastry.
- From the total amount of margarine you need to break off 50 grams, this is for the dough. The remaining 300 grams should be placed on baking paper, covered with it, and rolled out until a layer of about a centimeter is obtained.
- Place the margarine directly in the paper on the refrigerator shelf. It should rest for about an hour, and during this time you can prepare the dough.
- Beat the egg into a bowl, add cognac and salt. Melt margarine - 50 grams, cool it, pour it into the egg with cognac. Stir until the salt is completely dissolved, and then add a glass of kefir, stir with a whisk.
- Sift the flour, pour the kefir mixture into it, knead the dough for 10 minutes. You need to knead vigorously to make the dough more elastic. The final product should not stick to your hands or to the table. Place the dough in the refrigerator for half an hour.
- Rolling: Place the dough on a work surface and roll out into a thin layer. Place a layer of margarine on top, close the envelope, seal the edges, and roll it out. Fold in 4 layers and put in the refrigerator for half an hour. You need to repeat the procedure 3 times.
All that remains is to bake the cakes and cover them with custard!