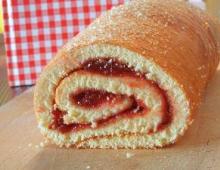
Cake “Lady fingers”: the most delicious recipe with photos at home. Cake “The most tender lady fingers Cream for lady fingers with condensed milk
Cooking instructions
1 hour Print
1. Turn on the stove to heat up to 200 degrees. Line a baking sheet with parchment paper. Bring flour, water, salt and butter to a boil, stirring. Add flour all at once. Tool Oven thermometer How the oven actually heats up, even if you set a specific temperature, can only be understood with experience. It is better to have a small thermometer on hand that is placed in the oven or simply hung on the grill. And it is better that it shows degrees Celsius and Fahrenheit simultaneously and accurately - like a Swiss watch. A thermometer is important when you need to strictly observe the temperature regime: for example, in the case of baking.
2. Stir the dough with a wooden spoon until a lump forms. Set aside to cool for 7-9 minutes.
3. Place the slightly cooled dough in a bowl and beat with a blender or mixer, beat in the eggs one at a time. Mixer tool It is convenient to beat egg whites, as well as knead other substances like minced meat or dough, not by hand (as this requires effort and time), but using a mixer like a KitchenAid. For example, the Artisan model has ten speed modes and three different attachments for working with any consistency, and it is also a universal food processor.
4. Place the dough into a pastry syringe or plastic bag with a cut tip. Pipe strips of dough onto a baking sheet. The size of the strips is 1 cm x 5-6 cm.
5. Bake the fingers for 15-20 minutes in a preheated oven.
6. While the eclair fingers are baking, prepare the cream. Cool the cream and 450 ml of sour cream. You can also put the bowl in which you will whip the cream in the refrigerator for 10 minutes. So, mix 450 ml of sour cream, condensed milk, powdered sugar and vanillin. Start beating with a mixer. Add cream. Beat until foamy.
7. Remove the fingers from the oven and cool. Place a little cream (3-4 tablespoons) on the bottom of the removable cake pan and smooth it out.
8. Place the eclair fingers into the pan.
9. Place the fingers in several layers, starting from the edge of the mold, grease each layer with cream. Fill the empty spaces of the layer with cut pieces of eclairs.
10. Thus fill out the entire form. Place the remaining cream in a bowl with a lid and store in the refrigerator until the time to decorate the cake.
11. Cool the cake in the refrigerator. Keep it there for at least two hours. It is best to leave the cake in the refrigerator overnight. In the morning (or a couple of hours later), prepare a cake pan on a leg. Cover the edges of the cake pan with foil (so as not to stain it with icing).
12. The cooled cake must be removed from the mold. Use a knife to run along the edges of the mold.
13. Turn the cake over onto a cake pan and remove the bottom of the pan.
14. Cover the top and edges of the lady fingers cake with the remaining cream.
15. Prepare chocolate glaze. In a saucepan, mix cocoa powder, sugar and sour cream (150 ml).
16. Bring the mixture in a saucepan to a boil, stirring. Cook until the sugar has completely melted. Then remove from heat and add butter. Stir until smooth.

Today we have a wonderful recipe for lady finger cake. The cake turns out very tender and tasty, although preparing the cake requires a little effort. But I assure you, the result will exceed all your expectations. The work of making “fingers” requires skill, follow everything strictly according to the recipe and you will create a culinary masterpiece at home with your own hands.
Products:
1. Butter - 160 g (150 g for dough + 1 teaspoon for glaze).
2. Milk - 1.5 cups
3. Flour - 1.5 cups
4. Salt - 0.5 teaspoon
5. Sour cream 25% - 400 g
6. Chicken egg - 4-5 pcs (depending on size)
7. Condensed milk (boiled) - 500 g
8. Chocolate - 50 g (for glaze)
9. Any nuts - 150 g (optional)
10. Cream - 1 teaspoon (for glaze)
How to make the cake:
Make the choux pastry: pour milk into a saucepan, add salt and shaved butter. Bring to a boil.

Add all the flour at once and reduce the heat to low. Warm the mixture over low heat with constant stirring.

When the mass rolls into a single lump and easily separates from the edges of the pan, remove the pan from the heat. Let the dough cool.

Add one egg at a time and stir. As a result, you should get a fairly soft, not thick, but not very liquid dough. If the dough is very thick, it will be difficult for it to rise, and if it is too liquid, it will spread when baking.

Next, we make the “lady fingers” ourselves. Use a pastry syringe with a small diameter nozzle for this purpose. Squeeze out small sausages with a syringe and cut them off with scissors (dipped in water). If you don’t have a syringe, you can use a milk carton, cutting off the corner just a little, or roll up a bag of thick paper and also make a small hole at the end.

Place the custard strips on a baking sheet lined with baking paper at a sufficient distance from each other, since the dough increases in volume very much during baking.
Bake in the oven at 200 degrees for the first 10 minutes (do not open the oven door, otherwise the dough may fall) Then lower the temperature to 180 degrees and bake until golden brown.

A little advice: It is better to overbake the choux pastry a little rather than underbake it. The half-baked dough falls off and turns into a pancake.
As a result, you will get a whole pile of light, airy “Lady fingers”.
Prepare the cream: first mix and then beat condensed milk with sour cream. All is ready.

Gently mix the custard mixture with the cream.

To obtain chocolate glaze, melt chocolate, butter and cream in a water bath or in the microwave until smooth. As a result of heating, you should get a homogeneous pouring chocolate mass.
We assemble our cake: we make a cake of any shape - square, circle, rectangle.
Decorate with chocolate or nuts, you can take both. The finished cake needs to be given a little time to brew!

Bon appetit!
Lady fingers cake is made from choux pastry and soaked in sour cream. The result is a cake with a very delicate taste, not cloying, with a slight sourness. It is advisable to make it the day before so that it has time to soak.
First you need to prepare the choux pastry. To do this, take a small saucepan, pour water into it and add butter and salt. Stir and bring to a boil so that the oil is completely dispersed in the water.
Sift the flour.

As soon as the oil and water boil, reduce the heat on the stove and pour all the flour into the pan at once, quickly knead the dough with a wooden spoon.

Mix quickly until it forms a test lump.

Then add the eggs, one at a time, beating thoroughly each time. And so add all the eggs one by one. You can beat with a wooden spoon or an electric mixer.

You will get this choux pastry.

Transfer the resulting choux pastry into a cream bag or a regular plastic bag.

Use scissors to cut a small hole at the bottom and release the dough through it in the form of small elongated sausages. Release immediately onto baking paper on a baking sheet.

Send to a preheated room at 230 degrees. oven. After 15 minutes, reduce the oven temperature to 170 degrees. bake until done.

Pour the finished sticks onto the table and let them cool.

Beat sour cream with sugar until you get a fluffy cream.

Take a mold and place a row of custard sticks in it.

Place a layer of sour cream on the sticks.

Then again sticks.

Then again cream. And so collect all the layers until all the cream sticks are gone.

Pour out the remaining cream and coat all sides thoroughly.

Lady fingers cake is ready. You can decorate it as you wish.

Let the cake soak for several hours and then serve.
This cake, unlike most other types of these pastries, is made not from cake layers, but from homemade “Lady Fingers” cookies made from choux pastry. Small elongated pieces visually resemble sleek lady fingers, which is why the cake received such an unusual name. Lady fingers cake is prepared in different ways: with several varieties of creams, with the addition of fruits, nuts, chocolate, etc. Let's take a step-by-step look at the most popular recipes loved by many housewives. In the photo you can see options for decorating the cake, and step-by-step instructions contain a clear preparation algorithm.
Classic lady finger cake recipe

This recipe was often used in Soviet confectionery and culinary shops. It is advisable to prepare the cake in the evening - it should brew for 8-10 hours.
Required Products:
- butter – 150 g;
- drinking water – 250-300 ml;
- high-grade wheat flour – 1.5 tbsp;
- eggs category CO – 6 pcs.;
- fine salt – 2 pinches;
- sour cream (preferably homemade) – 2 tbsp.;
- powdered sugar – 0.75 tbsp;
- chocolate chips – 50-70 g.
Step-by-step instructions for making the cake:
- Prepare the base for the cake - “fingers”. Pour water into a saucepan with thick walls. Add oil, salt. Place on the stove, turn on moderate heat. Wait until it boils.
- Add flour in portions, stirring continuously with a spatula until the dough comes together.
- Remove from stove. Cool to a temperature of 70-80° C.
- Beat in the eggs one at a time. Stir until smooth before adding the next mixture.
- When the dough turns into a viscous, uniform mass, it is ready.
- Preheat the oven to 180 degrees. Grease a baking tray generously with oil and sprinkle with flour.
- Transfer the batter into a pastry bag (syringe). If there is no equipment, you can use a plastic bag with a corner cut off.
- Press thin sausages the size of a finger (about 8-13 cm) onto a baking sheet. It is important to leave sufficient distance between portions of the dough, as the mass will increase several times.
- Bake the “fingers” for 30-40 minutes until golden brown. Cool on a wire rack.
- Prepare the cream. Beat cold sour cream with powdered sugar until a strong airy mass is formed. Beat at low speed with a mixer or by hand so that the cream does not turn out too liquid.
- Dip the cooled “fingers” generously into the cream. Place on the bottom of the baking dish, close to each other. Make several layers until you run out of blanks. A little cream should be left to grease the sides of the cake.
- Place in the refrigerator for 9-12 hours so that the cakes are soaked and the cake holds its shape. An hour before serving, remove from the refrigerator and transfer to a large platter.
- Sprinkle the sides with chocolate bar crumbs. Drizzle melted chocolate over the top of the cake. You can arrange the dessert at your own discretion.
Important! Do not beat the mixture vigorously. You can only stir until the consistency becomes homogeneous.
Cake “Lady fingers” with delicate creamy sour cream, strawberries and kiwi

This dessert turns out very tender and light. The pleasant creamy taste is complemented by a bright berry note, making the cake truly festive.
Ingredients:
- purified water – 300 ml;
- butter (margarine) – 100-120 g;
- salt – 0.5 tsp;
- large eggs – 6 pcs.;
- flour – 170-180 g;
- cream 30-50% fat – 150 ml;
- fat sour cream – 1.2 kg;
- granulated sugar – 0.53 kg;
- vanillin – 10-15 g;
- ripe kiwi – 250 g;
- fresh strawberries – 250 g;
- colored coconut flakes (optional) - to decorate the sides.
Cake making video:
Detailed recipe for cake with custard fingers:
- Place oil in a deep container. Add salt, add water. You can use low-fat milk.
- Place on high heat. Stirring, bring to a boil.
- Reduce heat, add sifted flour. Mix quickly. The dough should be cooked and stick well to the sides of the pan.
- Remove from stove. Transfer to a mixer bowl. Stir at minimum speed for 3-4 minutes until the consistency becomes homogeneous and hot steam comes out.
- With the mixer running, beat in the eggs. The dough should come out viscous, shiny, smooth.
- Transfer the finished mixture into a pastry bag with a round tip (d=1 cm).
- Turn on the oven. Prepare a baking sheet: grease it with a piece of fat.
- Press out thin sticks from the dough, leaving 2 cm from each portion.
- Bake at 200 degrees. Duration - 20-25 minutes.
- Cool the resulting sticks. Break into pieces 10-15 cm long.
- While the dough is cooling, put sour cream, 0.5 kg of sugar, and vanilla into the mixer bowl. Beat until a fluffy thick mass is formed.
- Slice strawberries and kiwi into thin slices.
- Place a few spoons of cream in a springform pan (d=28 cm) and spread evenly over the bottom. Dip the “fingers” generously into the cream. Pack tightly into the first layer. If there are gaps left, they must be closed by breaking a piece of the workpiece into pieces.
- Sprinkle with a thin layer of berries.
- Place the next tier of “fingers” dipped in cream on top.
- Layer with berries.
- Fill the third layer with the remaining cream and custard tubes. Level the surface and cover with a lid. Place something heavy on top so that the cake is well compressed.
- Place in the refrigerator for 5-8 hours.
- Carefully turn the finished cake onto a large plate and remove the mold.
- Separately, beat the cream with the remaining sugar until you get an airy cream.
- Grease the top and sides of the cake with the resulting cream.
- Top with berries. Sides - sprinkle with coconut flakes.
Tender “Lady fingers” with condensed milk

This cake can be prepared without any special culinary skills. All you need are the necessary ingredients, a lot of desire, time and imagination to decorate the dish. The only minus of the dessert is that it is so tasty that it is eaten very quickly.
List of components:
- butter – 160 g;
- flour – 300 g;
- table salt – 1-2 pinches;
- cow's milk – 300 ml;
- eggs – 4-5 pcs.;
- boiled condensed milk – 0.5 kg;
- sour cream (25-30% fat content) – 0.35-0.4 kg;
- chocolate (black, milk) – 50-80 g;
- cream – 10-15 ml;
- nuts – 150-200 g (for decoration).
Cooking steps:
- Cut 150 g of butter into pieces and place in a saucepan. Pour in warm milk. Add salt. Put on fire.
- When the mixture boils, add flour. Stir well. Reduce heat, continue stirring. You want the dough to curl up and turn into a viscous lump that will come away from the walls of the dish.
- Remove the pan from the stove. Cool contents slightly.
- Add eggs one at a time. Mix them with a spatula (mixer) into the resulting mass. There is no need to beat vigorously.
- Line a baking sheet with parchment paper or grease with a piece of butter.
- Transfer the liquid custard mixture into a syringe (bag). Pipe thin strips of small diameter. You can adjust the length of the sticks using scissors moistened with water. Be sure to leave a large space between portions, because the dough increases in size two to three times during baking.
- In the absence of a mold for squeezing, you can spread the mass with a teaspoon. Then instead of “fingers” you will get oblong balls.
- Bake in an oven preheated to 200 degrees for 20 minutes. Readiness to check by color: ruddy (golden) hue - the strips are baked. Pale - let them stand a little longer. You need to be careful with choux pastry. It’s better to overcook it a little than to underbake it. Damp tubes quickly fall off and do not hold their shape at all.
- Cool the baked “fingers”.
- Preparing the cream. In a large container, first mix and then beat the condensed milk with sour cream.
- Carefully place the cooled tubes into the cream so that they are well soaked in the creamy mass. Let stand for 5 minutes.
- In a small bowl, mix 10 g butter, chocolate, cream. Heat in the microwave (melt in a water bath). This will be the chocolate icing for decoration.
- Now you need to assemble the cake. Place a few spoons of cream on the bottom of the springform pan, and then line the first layer of fingers. They should fit tightly to each other without gaps.
- Repeat the steps, laying out another 2-3 layers of fingers. Smooth the top well with a spatula.
- Pour chocolate icing over everything and sprinkle with crushed hazelnuts. You can use walnut slices or almonds. Make chocolate figures if desired. Use it to decorate the sides and top of the cake.
- Keep the finished dessert in the refrigerator for at least 6 hours so that it hardens well.
Bon appetit!
Assembling the cake is very simple: the pieces are mixed with cream. In cross-section, it turns out to be very unusual. The emptiness inside the fingers gives it airiness. This custom cake will take 2 hours to prepare and will need to be refrigerated for another 2-3 hours for final hardening. The cake is of the custard type.
Ingredients
For the test, take products in the following proportions:
- Cooking margarine (butter) - 125 grams.
- Flour - 1 cup.
- Plain water - 1 glass.
- 4 pieces of chicken eggs. You may need more or less eggs depending on their size.
The cream is prepared from the following products:
- Condensed milk (not boiled) - 200 grams.
- Butter - 200 grams.
Cooking process
The first step is to prepare the fingers so that they are completely cool before mixing with the cream.
So let's get started:
- Pour water into a saucepan and heat slightly.
- Add butter. To make it melt faster, you can cut it into pieces with a knife.
- Boil the mixture until the margarine or butter is completely dissolved.
- Without removing the saucepan from the heat, gradually add flour to the butter mixture.
- Reduce heat to maximum and knead the dough until smooth. Make sure it doesn't burn.When the dough has cooled to about 70 degrees, we begin to introduce eggs into it. You can’t pour in everything at once; you need to do this gradually, one egg at a time. After pouring in the first mixture, thoroughly knead the dough. You can do this manually, but it is much more convenient to use a mixer, selecting the maximum whipping speed.
The finished dough is not sticky, homogeneous, without lumps. If it's too dry, add another egg or half. When you see that it is becoming runny, do not add more eggs.
We begin to place our fingers on the baking sheet:Place the dough in a pastry bag or a thick bag, first cut off the corner. The diameter of the nose should be small, only 1-2 centimeters, so that the fingers are small.
Cover a baking sheet with parchment and grease it with oil: refined vegetable oil or melted butter.
The fingers should be 3-4 centimeters long and about 1 centimeter wide.
Preheat the oven to 200 degrees, place a baking sheet in it.
When the tops of the fingers turn brown, take them out and let them cool. Meanwhile, prepare the cream:
- Beat the butter with a mixer until it turns white.
- Pour in condensed milk.
- Beat the cream for about 5 minutes, no more.
Assembling the cake:
- Prepare a springform pan.
- Cover the bottom with parchment paper.
- Place the fingers on the bottom in one layer. Place them tightly so that there are no gaps and the cream does not flow down.
- Coat them with cream.
- Lay out all the layers in the same way. Grease the top of the cake with cream.
Carefully remove the sides of the mold. Turn the cake over onto a plate. Coat the bottom, which has now become the top, with the remaining cream and decorate:
- Use dark chocolate melted in the microwave to create stripes around the edges of the cake.
- Place chocolate petals in the center to form a flower. Drizzle melted mixture into the center of the petals to secure them. You can use chocolate dragees.
Place the cake in the refrigerator for a couple of hours. Then you can enjoy the amazing taste of this “ladies’” dessert.