Handmade salt dough. Salt dough recipes for various crafts (the best recipe). Basic “working recipe” for simple crafts
There is a lot of information on the Internet about how to knead salt dough, how to sculpt it, but at the same time, few masters share various small secrets for working with this interesting material. Today you will learn 11 secrets of salt dough crafts for beginners that will help you create more beautiful works and make it easier to work with.
Channel: Drawing with children
Recipe for salt dough for crafts:
- 1 cup flour
- ½ cup of water (maybe more - depends on the amount of gluten in the flour)
- ½ cup salt
- vegetable oil
Pour flour, salt into a bowl, pour out water and knead the dough. If you suddenly find that there is too much water, add a little flour. The dough should look like plasticine.
1. The first secret is the secret of the dough, from which figures come out that do not crack when dried.
A very common problem with salt dough products is that they begin to crack when dry. What can be done to prevent this from happening? To prevent the dough from drying out and cracking, you need to add a little vegetable oil to it. For the above proportions, ½ teaspoon is enough.
2. In order for the finished salt dough figurine to be more durable, unbreakable and unbreakable, you need to add 2 tablespoons of wallpaper glue or PVA glue when kneading into the salt dough at the above proportions. Then, after drying, the figurine will become more durable and it will be impossible to break it.
3. If, when kneading the dough, you feel that it is too dry and when breaking it has dry edges, wet your finger in water and lightly grease the dough at the break point with a damp finger. After this, knead the dough well. If necessary, repeat.
4. The dough must be kneaded to such an extent that it is not rough to the touch. You need to knead the salt dough for a very long time. It is better to knead in small portions so that the piece fits in your hand. Once you feel the dough has become smooth, place it in cellophane and refrigerate.
5. If you first sculpt from ordinary dough and paint it with gouache after drying, then the painted work must be varnished. Surface varnishing protects the finished work from moisture and gives additional richness to the colors.
Since children cannot work with varnish, it is better for children to pre-color the dough and use food coloring for coloring. To color the dough, you need to flatten a piece, sprinkle a little dry food coloring in the middle, dip your finger in water and wet the coloring. Gather the flattened dough into a lump with dye inside and begin to knead it and knead it. The dough with dye kneads faster, it is softer and more elastic than usual.
6. If you paint the finished product with gouache, then in order to prevent it from staining your hands in the future, you need to add a little PVA glue to the paint.
7. If you start sculpting from dough and, after rolling out the layer, you see cracks in it, you must wet your finger with water and cover these cracks. The surface of the future product must be perfectly flat. The appearance of cracks usually means that the dough has not been kneaded well.
If a crack appears on the finished figure, then drop water onto the crack so that it flows inside and carefully cover it until smooth. Water will help seal the crack.
8. Roll out the dough to a thickness of at least 3 mm.
9. If you are making flat figures, then when the work is ready, turn on the oven to the lowest heat possible and, without closing the oven, dry until completely dry. Otherwise, they will lead, they will swell and lose their shape. Very often you can hear advice that you can dry your work on a radiator. However, the dough takes a very long time to dry on a radiator. It may dry out on top, but the inside will be damp and may break or become deformed in the future.
10. After cutting out a flat figure, the edges are uneven and rough. Dip your finger in water and smooth the edges until smooth. Then the figurine itself will be worthy of being given as a gift and not to be embarrassed.
11. When cutting out a figure from the dough, you cannot “pull” the knife: the dough can begin to stretch behind it. You need to cut using pressing movements, piercing the dough around the perimeter of the figure.
In the video master class you can also watch how to make a New Year's craft from salt dough - an angel figurine to decorate gift wrapping.

You can make a huge number of crafts from salt dough, for example: flowers, animals, various figures, inscriptions, numbers, toys, paintings and whatever you want! Modeling from salt dough is called bioceramics. The advantage of salt dough is that it is convenient to work with, this material is absolutely harmless and crafts made from it will delight you for several years. In this article we will look at how to make crafts from salt dough with your own hands.
You will need: a glass of wheat flour, a glass of extra salt, half a glass of cold water, a bowl.
Recipe
The finished salted dough should not stick to your hands or crumble. It should be cool and easy to sculpt. I recommend watching the video master class!
There are two most common ways to dry salt dough. The first method: the finished craft will dry on its own. The main thing is that it should not be exposed to direct sunlight, otherwise it will crack. The craft can be placed on a flat surface and wait a few days. Second method: dry the finished craft in the oven for 3 to 6 hours (depending on the size of the craft). Drying occurs in batches with breaks. One approach is 1-2 hours. For quick drying in one go, set the oven to 75-100 degrees, and then the craft will dry in an hour. At a temperature of 120 degrees, the craft will dry in 30 minutes, but it is better to dry it naturally.
There are two most common ways to color salt dough. The first method: after drying, paint the finished craft with acrylic paints or gouache using a brush. Second method: food coloring is diluted in water, then added while preparing the dough. When the craft is completely painted and dried, it must be coated with transparent manicure or furniture varnish in 2-3 layers. Each layer must dry before applying the next. This way the craft will last for a long time.
You will need: colored salt dough, stack, clear manicure polish, toothpick.
Master Class

The salt dough star is ready!
Salt dough caterpillar
You will need: colored dough, knife, pva glue, toothpick, pendant, clear manicure polish.
Master Class
- Roll out the sausage.
- Cut it into 6 equal parts.
- Roll into balls.
- Glue 5 balls together.
- Glue the head.
- Make a nose and eyes, then glue them on.
- Poke a toothpick into the hanging area.
- Dry the craft.
- Attach the pendant.
The salt dough caterpillar is ready!
Salt dough apple
You will need:
Master Class
- Make half an apple, make the inside flat, pressing it onto a flat surface.
- Make a thin flat center and glue it to the main part.
- Roll 6 seeds and a stick, then glue to the apple.
- Blind the leaves, then glue them.
- Dry the craft.
- Apply varnish and wait until completely dry.
The salted dough apple is ready!
Salt dough elephant
You will need: colored salt dough, pva glue, clear manicure polish.
Master Class
- Make the elephant's body by rolling an elongated ball.
- Make 4 legs in the shape of plump sausages.
- Make a proboscis.
- Make the elephant's ears in this way: roll out 2 flat cakes, glue flat cakes of the same shape of a smaller size and a different color to them.
- Make a small ponytail.
- Blind your eyes.
- Assemble the elephant in the following sequence: glue the legs to the body, then glue the proboscis, then the ears, eyes and tail.
- Dry the craft.
- Apply varnish and wait until completely dry.
The salt dough elephant is ready!
You will need: salt dough, foil, a candy bowl or similar plastic container, gouache, a brush, clear manicure polish, a modeling board, a knife or a stack.
Master Class

You will need: salt dough, nail scissors, PVA glue, acrylic paints or gouache, manicure brush.
Master Class
Salt dough hedgehog is ready!
Owl (eagle owl) made from salt dough
You will need: salt dough, pva glue, nail file, manicure scissors, acrylic paints or gouache, brush, wooden board with a pendant, clear manicure varnish.
Master Class

The salt dough owl is ready!
You will need: salted dough, the base on which the craft will be attached, for example, a board or plate, a glass or a knife, a sheet of paper, a simple pencil, a garlic press, a rolling pin, pva glue, acrylic paints or gouache, a brush, clear manicure polish, cloves.
Master Class

Salted dough fruit basket is ready! I recommend watching the video master class!
You will need: salt dough, knife, rolling pin, simple pencil, sheet of paper, sandpaper, acrylic paints or gouache, brush, transparent manicure varnish, glue gun or pva, base for crafts, for example: a board with a frame, transparent manicure varnish.
Master Class
- Draw a cat or print a template.

- Roll out the dough into a thin layer.
- Attach the template and cut out the cat.

- Dry the craft.
- Sand the craft with sandpaper, removing any unevenness.
- Using a simple pencil, transfer the desired design onto the cat’s body.
- Paint with paints and wait until completely dry.

- Glue the cat onto the base with the frame.
Salt dough pencil
You will need: water, flour, extra salt, cardboard jar for the frame, PVA glue, scissors, a piece of decorative rope or corrugated paper, gouache, brush, button, stacks, acrylic varnish for crafts, toothbrush.
Master Class
- Knead the salted dough in this way: add a glass of flour, a glass of salt, add water, then knead until the desired consistency of the dough. Separate part of the dough, add beige gouache, then knead.
- Roll out the cake to a thickness of 10-15 mm.

- Apply PVA glue to the outer rim of the jar and wrap it with dough. Cut off the excess with a stack and smooth the joints with a damp brush.
- Create a small dotted texture with a toothbrush on the surface of the dough.
- Knead the brown dough, roll it into a flat cake 10-15mm thick.

- Cut a 5cm wide strip of brown pastry and glue it to the bottom of the jar.
- Make 2 large owl eye bases from white dough, then glue them on.
- Make a beak out of brown dough and glue it on.
- Make eyes from turquoise dough and glue them on.
- Roll out 8 strips of pink dough, twist them into 4 flagella and make a bow, then leave it to dry for 2 hours.
- Make droplet-shaped owl wings using brown dough, then glue them on.

- Weave ropes of beige dough and glue them onto the neck of the jar.
- Roll out a sausage from white dough, draw the texture of the lace with a stack and glue it as a collar under the beak.
- Place the craft in a warm place for a day.
- Paint the bottom and wings with brown gouache and decorate with white dots.

- Draw the pupils and eyelashes with black gouache, wait until the paint dries, then paint white highlights on the eyes.
- Glue a pink bow above the wing.
- Glue a button with a bow from a corrugated strip onto the lace.
- Cover the craft with varnish and wait until it dries completely.
The salt dough pencil is ready!
Salt dough dachshund
You will need: salt dough, simple pencil, scissors, cardboard, paints, brush, rope, toothpick, foam sponge, clear varnish, PVA glue.
Master Class
- Draw a dachshund on the cardboard as shown in the image.
- Cut out the template.

- Roll out the dough to a thickness of 5 mm and cut out the dachshund according to the template.
- Roll out the oblong eyes, then glue them on.
- Blind the eyelids and glue them onto the eyes.
- Use a toothpick to outline the paws, nose, mouth, ear and body contours.

- Roll out an oval, then glue it onto the ear and smooth the seam with a wet finger. Use the same method to add volume to the dachshund's back and tail.
- Mark stripes in different directions around the entire perimeter of the dachshund, so that the stripes resemble wool.
- Dry the figurine.

- Glue a piece of rope to the back of the craft for further hanging.
The salt dough dachshund is ready!
Boletus mushroom made from salt dough
You will need: salt dough, light bulb, paints, brush, foil, cardboard, masking tape, superglue, PVA glue, paper napkins, clear varnish, stack.
Master Class
- Cover the light bulb with tape, then cover it with dough and dry the workpiece.
- Cut a ring out of cardboard and place it on the light bulb as a base for the hat.
- Form a hat from crumpled napkins, then secure with tape.

- Wrap the hat with foil.
- Roll out the dough to a thickness of 5 mm and stick around the cap.
- Remove the cap from the stem, cover the bottom with dough and make stripes in a stack.
- Glue the hat onto the leg.

- Mold the mushroom's arms, legs and nose, then glue them on PVA.
- Make a caterpillar and glue it to the hat.
- Dry the figurine.

- Paint the figurine, then leave to dry.
- Cover the craft with varnish and wait until it dries.
Boletus mushroom made from salt dough is ready! I recommend watching this video!
Funny salt dough pigs
You will need: salt dough, paints, brush, foam sponge, stack, thin rope, toothpick, black gel pen, PVA glue.
Master Class
- Roll 2 balls for the snout and use a toothpick to make the nostrils.
- Make a muzzle, glue a snout and eyes above it.
- Make triangular ears, glue them, then mark stripes with a stack at the junction of the ears and head.

- Make a heart and glue it to the bottom side.
- Make indentations along the edge of the entire circle.
- Using a toothpick, make 2 holes on the top for attaching the rope and 2 holes on the bottom for the legs.

- Roll up the arms and glue them in such a way that they hold the heart.
- Make the hooves and make holes in them for the rope.
- Dry the workpieces.
- Paint the blanks with black paint and let them dry.
- Wash off the paint from the convex parts of the workpiece under running water with a sponge and wait until it dries.

- Prime the figures with a sponge and white paint.
- Color the piglets.
- Draw small details with a black gel pen.
- Cover the craft with varnish and wait until it dries.

- Glue wool threads as hair.
- Make a pendant out of rope.
Funny salt dough pigs are ready! I recommend watching this video!
0 82 802
Modeling is one of the most useful activities for kids. With its help, not only fine motor skills of the hands develop, but also perseverance, creative thinking and coordination of movements are developed.
One of the best materials for modeling with your child is salt dough. It is absolutely safe, does not contain harmful additives and is easy to use. DIY salt dough crafts will become wonderful souvenirs for your relatives and friends.
Universal recipes
You can find a great variety of salt dough recipes. Each master adds his own additives to them, selecting the desired consistency. The main products for kneading dough are salt, flour and water.Depending on its purpose, its thickness may vary:
- dense dough - for large parts and creating massive panels;
- universal dough of medium consistency - it is convenient to make small pictures and figures from it;
- soft dough - tender and pliable, it is suitable for small elements, exquisite flowers and figurines.
Thick dough
To work you will need:- wheat flour - 1 part;
- table salt - 1 part;
- water - 0.7 parts.
That is, to knead this type of dough you need to take one identical measure (glass, cup, tablespoon) of salt and flour and 0.7 of the same measure of water.
Combine the dry ingredients in a deep bowl and add cold water little by little. The dough should be homogeneous and very dense. There will be grains of salt in it - this is normal, don’t worry. Depending on the humidity and quality of the flour and salt, you may need a little more or less water. Therefore, you can’t pour it into the dough all at once.
Medium consistency dough (all-purpose)
To work you will need:- wheat flour - 1 part;
- water - 1 part;
- table salt - ½ part;
- finely ground salt (extra) - ½ part.
Soft dough
To work you will need:- wheat flour - 1 part;
- hot water - 1/4 part;
- finely ground salt (extra) - 1 part;
- PVA glue - ¾ parts.
This dough is ideal for complex work. It holds its shape perfectly, preserving the prints and texture created on it. Its quality directly depends on the quality of the chosen glue.
The figures made from salt dough with glue differ special strength. They will delight their owner for many years.
- If you plan to color finished products, it is better to use wheat flour, although you can also use rye flour for salt dough.
- You cannot use iodized salt - the finished figures may crack when drying.
- The dough can be tinted while kneading. For this, food coloring or watercolors are used.
- The finished dough must be wrapped in cling film or a plastic bag to prevent it from drying out.
- A failed dough can be revived. If the dough is too liquid, you need to add a little more flour and knead again; if the dough is too tight, moisten it with water and knead, achieving the desired consistency.
- Do not add fat or hand cream to the dough from which you plan to paint the products - the paint will apply unevenly.
- The finished dough should be stored in the refrigerator for no more than 2 days. It loses its qualities and it will be inconvenient to work with it.
- It is best to sculpt volumetric products on wire or cardboard frames so that they do not fall apart.
- Crafts can be dried naturally, leaving them for a couple of days, baked in a warm oven, or left next to the radiator. It is strictly not recommended to place figurines on the battery itself to avoid cracking.
- It is best to paint crafts with acrylic paint or gouache. Watercolors should not be used: there is a risk of getting wet and ruining the product.
- The junction of the parts must be moistened with water using a brush. This way they will connect firmly and quickly.
- The finished souvenir can be coated with clear nail polish or acrylic varnish. This will protect it from moisture and the paint from fading.
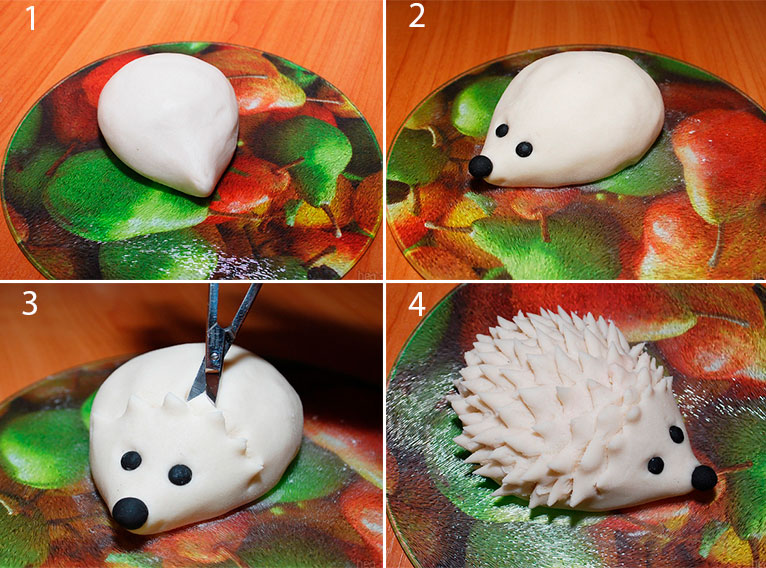
Cute hedgehog - toy for kids
Do you want to know what you can make with your child using salt dough? Start with the simplest crafts. The younger your baby, the simpler the products for joint creativity should be. Try to make a prickly hedgehog, and a detailed description of the process in this tutorial will guarantee an excellent result and a good mood from a useful activity.
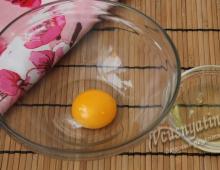
First of all, prepare universal salt dough and nail scissors. Roll a piece of dough into a drop-shaped piece.

The hedgehog's eyes and nose can be made from beads, black peppercorns, or pre-colored dough.

The needles are made using cuts. Use the tips of the scissors to make small cuts, lifting the needles up.

Perform the next row in a checkerboard pattern - with an offset. Row by row, make cuts until the entire back of the hedgehog is covered with needles.

Dry the finished toy in the oven or simply in a warm and dry room. If you wish, you can color it or entrust this important task to your child.

Original souvenir - funny dachshund
You can start preparing for the upcoming New Year holidays in advance and make a funny dachshund as a gift for your friends.
To work you will need:
- universal salt dough (see recipe above);
- cardboard, pencil, scissors;
- paints and brush;
- a piece of rope;
- clear nail polish;
- toothpick;
- foam sponge;
- glue "Dragon".
Transfer the template to a piece of cardboard and cut it.

Roll out the dough to approximately 5mm thickness on baking paper. Attach the template and cut out the outline of the dachshund along it. Carefully remove the trimmings so as not to deform the workpiece.

Roll two balls and form them into oblong dachshund eyes. Glue them with a drop of water to the head of the workpiece. Moisten all sections of the dog with water and smooth it with your fingers to remove all irregularities.

Use two small pieces of dough to make eyelids and glue them above the eyes. Use a toothpick to outline the ear, paws, mouth, nose and body contours.

Now you need to add volume to the workpiece. Roll the dough into an oval, glue it onto the ear and smooth the joint with a wet finger.

Add volume to the dachshund's back and tail in the same way.

Use a toothpick to press oblong dents around the perimeter of the figure. Make them randomly of different lengths from the edges of the body to the center.

It's time to dry the workpiece in a warm oven. Bake it until it is completely firm.
The dry figurine needs to be painted. Cover all areas where there are bulges and dents with black gouache.

After the first coat of paint has dried, paint the dachshund yellow. Put a little paint on a foam sponge and tint the entire body, while the dents should remain black - do not overdo it.

Draw the eyes of the dried dachshund in white. Make any inscription you wish.

Glue a piece of rope to the back of the craft.

Cover the product with clear varnish and let it dry. The result of the work done is impressive - the mischievous puppy is ready.

Dog with original coloring:


Spectacular fish - step-by-step master class
Try making a beautiful fish with your child. Just follow the detailed instructions - and even your little helper will be able to master this sculpting technique.
To work you will need:
- universal salt dough;
- brush;
- corrugated felt-tip pen cap;
- ruler.

Pinch the dough on one side of the circle with two fingers, forming a tail.

Correct it and smooth out any rough edges.

On the opposite side, make a mouth for the fish using the handle of a brush.


Use the edge of a ruler or the blunt side of a knife to press the marks on the tail and fins.

Roll small balls and glue them onto the fish's head. These will be the eyes.

Make pupils from smaller balls and press them onto the eyes with the handle of a brush.


It's time to decorate the blank. Use the cap of a felt-tip pen to press down the first row of scales.

Roll a lot of small balls. Glue them with a drop of water to the body of the fish immediately behind the cap imprints and flatten them with the back of the brush.


If there is a suitable imprint, make imprints in the shape of a starfish; if not, make do with an already familiar cap or take another template.

Then push two more rows of cap impressions.

Roll into a thin sausage to form a tail.

Glue it to the blank on the edge of the tail. Fill the entire tail in the same way.

Next, chaotically stick and push a few more small balls.
Dry the resulting workpiece in a warm oven.

Color the fish, guided by your ideas of beauty and the colors available. If you glue a magnet to the back of it, it will proudly take its place on the refrigerator, decorating the kitchen of its happy owner.
Here are some more ideas with fish:


Cheerful boletus mushroom
The initial stage of learning to sculpt is already behind us - you can begin to make more complex products from universal salt dough. Try to master the lesson of making a funny big-eyed boletus. Such an interesting mushroom will be appreciated not only by children, but also by adults.
To work you will need:
- universal salt dough;
- burnt out light bulb (classic pear-shaped);
- cardboard;
- acrylic paint or gouache;
- foil;
- paper napkins;
- masking tape;
- Super glue.

Cut a ring out of cardboard and put it on a light bulb - this is the basis of the future mushroom cap.

Form a hat of the desired size from crumpled paper napkins. Secure the structure with tape.


The result is something like this.

Wrap the hat in foil for added strength.


For the hat you can use dough of any color; later the whole toy will be painted. Roll out a piece of dough into a circle at least 3 mm thick and stick around the top of the mushroom cap.

Remove the hat and seal the bottom.

Use the blunt side of a knife to press the strips.

Secure the cap to the mushroom stem using superglue or Moment. It should be slightly tilted towards the back.

Get started with the design. Blind and attach the arms, legs and nose to the fungus.


You can decorate the figurine with a funny caterpillar or make another decorative element, such as a ladybug.

Dry the finished piece.

Paint the figurine, draw eyes and a nose and varnish. The amazing fungus is ready. You won’t be able to pickle it and eat it, but you can easily decorate a shelf with it.

Funny pig pendants
Such funny pendants are an idea for an unusual Christmas tree decoration or a cute souvenir for people dear to you.
To work you will need:
- universal salt dough;
- toothpick;
- thin rope;
- paints and brush;
- foam sponge;
- black gel pen;
- Super glue.
If you don't know how to make salt dough for crafts and are looking for ideas for your little one or for your own creative activities, this article lists many interesting recipes.

Salt dough modeling is interesting for both children and adults. The advantages of salt dough are obvious:
- safe for the baby, since the ingredients are natural;
- easy to make with your own hands at home at any time;
- does not leave marks on clothes, hands or furniture, and can be easily washed;
- the baby, having tasted it once, will stop putting it in his mouth;
- has a good texture, is perfectly molded, more flexible than the highest quality store-bought plasticine, and does not stick to the palms;
- this material does not require special storage conditions;
- can be painted in any way, decorated and painted, varnished to preserve the appearance of the product;
- it can be dried in air and in;
- the finished product can serve as a toy or souvenir without losing its shape and aesthetic appearance during various fun activities;
- its cost is lower than that of plasticine.
The disadvantage of salt dough is insufficient plasticity. It is problematic to make a doll or an elegant product with small details from this material without proper preparation. Although there are known craftsmen who are capable of this. However, even a beginner can make a beautiful magnet as a gift or a New Year’s decoration for a Christmas tree or home.

Salt dough in 5 minutes
The dough prepared according to the recipe below is suitable for everyone who loves modeling and can be stored for several months in the refrigerator.
Ingredients:
- 1 glass of water;
- 1 cup flour;
- a third of a glass of salt;
- 2 teaspoons of soda;
- 1 teaspoon vegetable oil;
- food coloring.
The process of preparing the dough in 5 minutes consists of 5 stages.
- You need to pour flour, baking soda and salt into a saucepan, add water and sunflower oil, and mix the mixture well.
- Place the container on the stove and heat over low heat for several minutes.
- Add food coloring and stir.
- When the dough sticks to the metal spoon, it is ready.
- Place the mixture on a plate, cool and knead with your hands.
A simple recipe for salt dough without cooking
How to prepare salted dough for crafts without cooking? There is a wonderful recipe that is not at all difficult to implement. Mix three quarters of a glass of salt with a glass of flour, five tablespoons of sunflower oil, add water heated to 40-50 degrees Celsius.
If you want to make the dough more flexible for the most fragile figures, use starch jelly instead of water.
From flour and salt
For this dough, you need to take a glass three-quarters full of flour and “Extra” salt, mix the mixture in a bowl. It should be poured with half a glass of pre-cooled water until a stiff dough is obtained, continuously stirring the mass to achieve homogeneity.
Voila, the dough is ready, let's get creative!
With PVA glue
Pour a glass of extra salt and flour into a bowl. Pour 1 tablespoon of PVA into 100-150 milliliters of water. Add this white-tinged liquid little by little to the mixture of flour and salt, kneading the dough.
It can be used immediately for crafts or stored in the refrigerator.
With glycerin

How to make salt dough for crafts with glycerin? It contains glue, which helps the mixture set and dry faster, but it is not suitable for babies.
Mix 1.5 cups of flour with the same amount of water, a glass of fine salt and a fifth of a glass of glycerin. The consistency of the dough should be like dumplings. Then pour in 5 teaspoons of glue intended for gluing, or PVA, diluted with water. The mass should be stirred thoroughly.
Without flour
To make play dough for children, you can choose the recipe without flour (a paradox, but a fact, it is possible!). In this case, you need to take 2 cups of soda, a bag of food coloring and a glass of starch. Then add half a glass of water, stirring continuously, simmer the mixture over low heat until a ball forms. Cool the mixture and use it for crafts.
Simple crafts made from salt dough
Puzzles
To make them, you need to roll out a thin layer of salted dough, then apply the contours of the future puzzle using a toothpick, and paint with gouache. Then you need to cut it into pieces with a knife or a stack and dry it.
Beads

We make balls from the salt dough prepared according to one of the above recipes, trying to make them the same size (for example, 3 centimeters in diameter), and then string them on wire or twine after painting with gouache or acrylic and drying the paint.
You can flatten them a little. You can color the beads in batches of 5. one color or apply an ornament. After covering the beads with acrylic varnish, the product will become stronger and take on a more aesthetic appearance.
Do not allow your child to play with the beads on their own unless they are supervised to ensure they do not accidentally swallow them.
The beads are ready, you can try them on!
Mushrooms
First, we make a sausage-shaped leg from salt dough, then we make a mushroom cap. You can use the lid, sprinkle it with flour to make it easier to remove. It should be noted that when drying the dough will settle a little, so it is better to make the hat a little larger.
The finished mushrooms can be placed on a baking sheet, which has been previously covered with foil, and placed in the oven (at temperatures up to 100 degrees Celsius) to dry. Turn the mushrooms over from time to time until the products harden.
Then comes the painting stage: you can, for example, paint the bottom of the cap, and then the stem with acrylic paint or gouache (mixed with PVA) white, and the top of the cap with light brown, dark gray or dark red paint.
When the product is dry, glue the caps to the legs using Moment glue. When the mushrooms are dry on the balcony, veranda or loggia, they are ready for use in the game.
Roses
Squeeze out circles from the dough prepared according to one of the recipes using a glass or cup from a set of toy dishes. These are rose petal blanks. Let's form the center of the flower with our hands. Then add 1 petal to the center one by one.
When you have collected all the petals, leave the rose to dry for a day in a dry room (not on a radiator, to avoid cracking). The cup can be used as a stand. After drying, you can paint the flower by applying gouache of different shades of red to the petals, starting with crimson.
Christmas decorations
Using a cocktail tube, you can make holes in the dough for an openwork pattern.
You can decorate Christmas tree decorations made from salt dough using beads. Please note that when using plastic beads, drying the product in the oven is not suitable, otherwise they will melt.
Instead of beads, you can take shells, pebbles from the bottom of the sea, cereals, buttons, even... shards from broken pottery will do. Ribbons and floss will also be used to decorate crafts.
Do you have the necessary mold for sculpting a figurine of the appropriate size on your farm? Take a cardboard stencil for cutting salt dough for a Christmas tree decoration.
The finished product can be decorated with sparkles by first applying glue to them.
You can stick a picture from a napkin or a sticker on a craft. Use PVA diluted 1 to 1 with water. Cut out a pattern from a napkin, remove the topmost layer and stick it onto the dough product. On top of the picture you need to apply 1 more layer of PVA.
A very original way to decorate products made from salt dough is to make prints with various objects that have an interesting texture that are at hand. For this purpose, baking molds, plasticine molds, ice molds, children's dishes, from a toy sandbox set, etc. are suitable. It is also interesting to sculpt by hand!
For decoration, it is recommended to prepare acrylic paints of different colors or mother-of-pearl paints, gouache mixed with PVA, glitter, acrylic varnish, stained glass contours, gold and silver glitter, ribbon, braid, twine, cotton and acrylic threads, iris, sequins, lace , rhinestones, etc.
How and with what to paint crafts?

Would you like to color your salt dough in different colors? To make crafts with preschoolers from 3 years old, you can use gouache and diluted watercolor, painting the crafts on top or adding it when preparing the dough. For modeling lessons with kids, it is better to use freshly squeezed carrot, beet juice and even... brewed coffee.
You can divide the dough into as many pieces as you have dyes, make a hole in each ball, drop the juice into it and knead the dough for even coloring. A wonderful option “for advanced” is mixing gouache with PVA to evenly cover the product.
Methods for drying finished products
In a preheated oven
You can dry the finished product in a slightly open oven, having previously set the temperature from 55 to 80 degrees Celsius. Place it in a preheated oven on a baking sheet lined with parchment paper, or place it in a heat-resistant glass container. The drying time is from 1 hour or more, depending on the size of the craft.
On open air
You can air dry the finished craft by placing it on a plastic or wood surface, keeping it away from direct sunlight. It will take longer, but it will be more effective. This drying will take approximately 3-4 days.
In a cold oven
Place the craft in a cold oven and only then turn it on, setting the temperature to 150 degrees Celsius. The products must cool in the oven.

- If the dough after drying turns out to be covered with bubbles and cracks, most likely you chose the wrong type of flour or did not follow the drying rules. It is better to choose the cheapest flour for salt dough - from rye or 2nd grade wheat. We recommend that next time you dry the product without haste in an oven preheated to 60-80 degrees, while opening the door slightly or placing the tray on the balcony.
- Did any cracks appear after painting? This is possible if you started painting a poorly dried product. Air dry them, correct any rough edges with sandpaper, and then paint them a second time.
- Is the product cracked? This was probably due to its great thickness. In this case, you should correct this by removing excess salt dough from the back side or at the bottom of the craft. To ensure that the product dries evenly in the oven, it should be turned over from time to time.
- Has the element broken off? Try to glue it with PVA or make up for the mistake by attaching a decoration.
- Has tarnishing appeared after painting? By covering the product with acrylic varnish, you can restore the color saturation and brightness.
Conclusion
Modeling from salt dough is suitable both for activities with children and for the creativity of adults. Both of them can create masterpieces that will become decorations for any home or wonderful gifts for the holidays.
Do you want to help discover the talent of someone close to you? Share this useful article with your friends!
Mother of two children. I have been running a house for more than 7 years - this is my main job. I like to experiment, I constantly try different means, methods, techniques that can make our life easier, more modern, more fulfilling. I love my family.

The basic “working recipe” for simple crafts:
For 1 cup of flour, take half a glass of salt and half a glass of water. At the same time, we take the same number of grams of flour and salt by weight, but the flour is larger in volume, which is why it comes out to half a glass of salt per glass of flour.
Salt dough recipe for thin parts:
To the basic working recipe, add a tablespoon of starch, or wallpaper glue, or PVA glue, and the wallpaper glue must first be diluted with water in a standard proportion.

Recipe for strong salt dough for large crafts:
A glass of flour, a glass of salt, half a glass of water.
Dough recipe for thin parts:
One and a half glasses of flour, half a glass of salt, 4 tablespoons of glycerin, sold in pharmacies, 2 tablespoons of wallpaper glue (previously diluted with water). The best way to mix the mass is with a mixer - it’s both quick and the composition is successful.

How to get colored dough:
Salt dough can be perfectly tinted with watercolors, food coloring, and gouache. If you add cocoa, you can get a gorgeous chocolate color. Please note that when the product dries, the color will become slightly lighter and less bright, so be sure to varnish the product after drying - the color will become brighter and more saturated.
How to knead flour
You cannot take flour with additives - baking powder and yeast, so be sure to read the ingredients! Just plain flour, otherwise it will turn out to be a cake? It will rise and there will be a bun.
Take fine salt, extra salt. The grains quickly dissolve and fit perfectly into the flour. Rock salt does not dissolve well and may produce grains. First, mix the salt and flour, and then add water!
Store the kneaded dough in a plastic bag so that there is no access to air. In the air, the dough becomes crusty, but this should not be allowed. You should also remove the play dough from the bag in parts in order to work with fresh material.
Tools for working with salt dough
A rolling pin is for rolling out dough, a knife is for cutting off the required pieces of dough, a comb is good for making relief patterns, a gel pen refill is convenient for squeezing out holes in the dough.

Stamps can be made from anything you can get your hands on. For example, some buttons, burlap, molds from children's sets for playing in the sand, handles of forks and knives from sets. The scope for creativity is limited only by your imagination and the availability of things in the house.
How to properly dry salt dough crafts
1 Set the oven to the lowest temperature.
2 if the temperature is not regulated, then reduce the heat to a minimum and open the oven door slightly (for gas stoves)
3 Place the product in a cold oven; heating should occur gradually, without sudden changes. In the same way, the product should cool inside the oven after it is turned off.
4 Some masters recommend drying in stages, taking breaks between drying. It is believed that this will make the product stronger. For example, it dries in the oven for an hour, dries on its own for a day, then we turn on the oven again and dry it for another hour, then it dries again for a day at room temperature.
5 The time required to dry a particular product depends on the mass of flour and the size of the craft.
Painting and varnishing
You can take any paints, acrylic, watercolor, gouache, whatever is closest to you, use it. It is best to coat the paint on top with acrylic varnish, but water-based construction varnish for wooden surfaces will also work.

If the product is swollen or cracked
If it's swollen, that means the wrong flour was taken. The best option is flour without any additives. For better adhesion of flour, you can add rye flour to wheat flour, in a ratio of 1 to 1, or 50 grams of starch, this will give the dough the necessary plasticity. You can also add a tablespoon of PVA construction glue to the dough.

If it's cracked, which means the abalone process was not carried out according to technology. Ideally, it is best if the product dries at room temperature, on its own, without any ovens. But in this case, the drying time can be more than a week. We don’t want to wait, so we can dry it at a minimum temperature in the oven, if it’s electric. Or with the door ajar, on minimum gas, if it is gas. At the same time, it is also important to turn the product over so that it dries evenly. Every hour and a half you need to turn the dough craft over during the drying process, otherwise it may crack.
The craft should be painted after it has completely dried., otherwise the paint may also crack due to the movement of the dough, which is not completely dried.
If something falls off, then glue it with PVA construction glue. Holds up perfectly!
These are all the basic secrets of kneading salt dough. for crafts. Otherwise, experience will come with each subsequent product. Create and delight the world with your handmade products!
Idea - salt dough candlestick

For a very long time I lost sight of such needlework as modeling from salt dough. And this despite the fact that I was always interested in both ceramics and polymer clay (plastic), but I avoided salt dough. Then somehow information came from different sides and I even tried to sculpt myself. I liked it, the only thing that bothered me was that the finished product cannot be dried instantly. However, salt dough provided a lot of opportunities for making various interior items - not only decorative, but also utilitarian.
If you like to create products for the home and interior, then you should definitely try making crafts from salt dough too! For example, you can use it to make a candlestick like this for a tea candle, or you can add something of your own to the design of the candlestick - painting or decoration.
Salt dough infographic for beginners

Salt dough is simply a unique material for those who love to sculpt. You can use it to make many beautiful things for your home: candlesticks, panels, souvenirs, everyday items. You may find it difficult to make ceramics from clay, but salt dough is much easier to work with!

Crafts made from salt dough - frog

For lovers of modeling from salt dough: a very good master class from Svetlana Kanochkina.
So, how to make such a cute frog (looks like ceramic). I really want to learn this sculpting technique. So far I have only made a candlestick and a fish, and even then, the tail of the fish fell off during the drying process.

We form the torso.

We pay attention to detail.

The frog is still in “disassembled” form.

We glue all parts of the craft with water mixed with PVA glue.

The porous skin can be formed with a toothpick.

We made such a beautiful frog craft made from salt dough. You can do it together with your child.